CREATIVE TECHNIQUE IN COASTAL PHOTOGRAPHY
A study at Bracelet Bay on the South Wales Coast
About our coastline?
The coastline is one of the most photographed landscape types of all; crashing waves, a multitude of beach features, lighthouses and castles in stunning locations. Changing tides and changing light make for an indefinite variety of dramatic and beautiful images
This paper illustrates how I’ve approached a location that I’ve visited a number of times and regularly include in my Swansea and Gower Workshops; Bracelet Bay at Mumbles in South Wales.
It shows crashing waves, smoothed out water with a long exposure, control of dramatic light, beach details and night photography and illustrates how you can approach this type of scene.
Planning for Weather, tides and shooting times and conditions
I’m often not one to plan too much; I prefer the spontaneity of just turning up at an area and seeing what happens. However, coastal photography generally requires some planning and knowledge of local conditions (perhaps more so than inland landscapes) due to strong landscape orientation and tide conditions.
Aspect / Orientation:The coastline typically faces in one primary direction. For example, the South Wales coast predominantly faces south (while for example the Northumberland Coast largely faces East). Of course, coves, inlets and bays can alter the general direction of the coastline to some degree, but the general ‘flow’ of a particular stretch of coastline will generally be in one direction. In this respect, the coastline differs from other landscape types; upland landscapes for example frequently offer views in a range of directions from east, south west and north and you can often adjust your shooting emphasis to suit the time of day, time of year and compositional strength.
This is usually not the case with coastal landscapes; therefore, an assessment of whether it’s a ‘morning’ or ‘evening’ shot is much more critical. In my example, Bracelet Bay faces South-East so it’s very much a dawn shot. However with short days and low sun it’s a location that has the potential for photography at all times during the winter months (the evening offers light from the side, offering light and shadow opportunities).
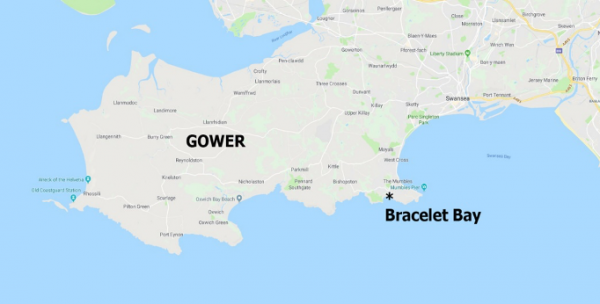
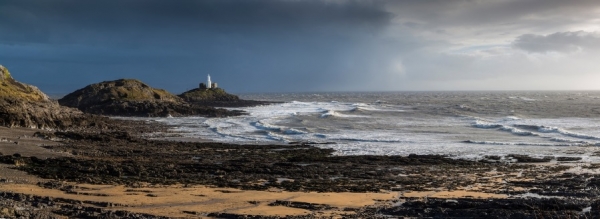
Bracelet Bay is at Mumbles, west of Swansea and at the eastern edge of the Gower Peninsula. It’s orientation primarily faces south-east and can therefore be at its best at dawn although Swansea Bay immediately to the east offers a greater range of options

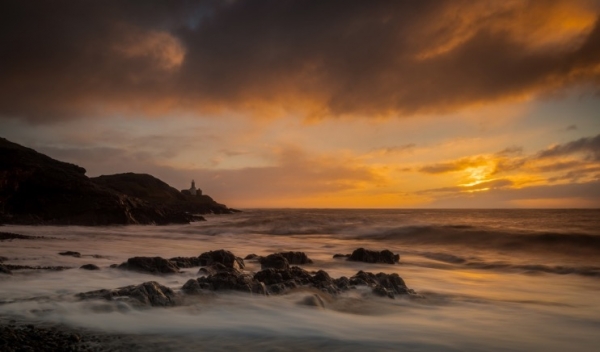
Bracelet Bay is at its best at dawnas the sun comes up behind the lighthouse during the winter months. This was taken on a workshop in Dec 2018 with the tide going out, as the sun was coming up. 16-35mm lens at 16mm, 2 seconds exposure; f9; 100 ISO

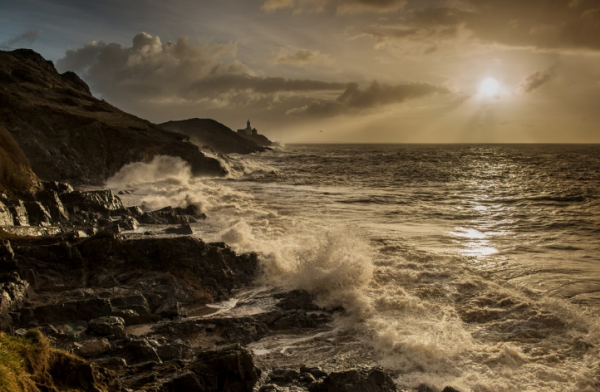
Panoramic Photomerge: While Bracelet Bay is typically a dawn / morning shot, it’s a good location all day in the winter as the sun stays low and sets quite far south. A merged image will also expand your angle of view. This shot was taken against the light sending dramatic light rays into the sea. 4 shot merged panoramic image. 16-35mm lens at 16mm, 1/125 sec exposure; f8; 100 ISO
Tide times:Tides change up to an hour from day to day; therefore, every day the tide is different. The images shown in this paper have used a variety of high and lower tides, each offering a variety of different images: A few key points as follows:
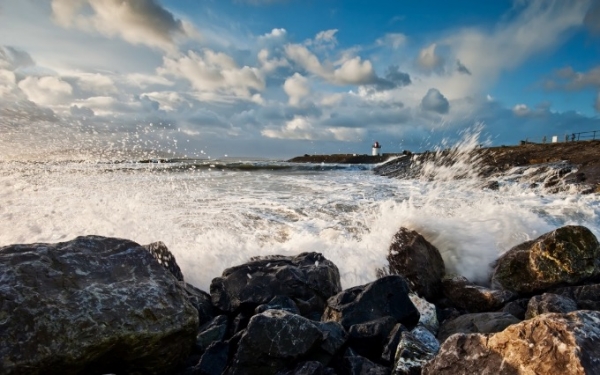
- High Tides:Crashing waves typically need high tides and high winds. They also need something to crash against so features such as lighthouses on rocky outcrops such as at Bracelet Bay are ideal. Beware though; these can be dangerous and never go too close!
- Medium tides:These are often best for photographing foreground features with waves swirling around them and can provide many creative opportunities. You’ll find that tides move in or out quickly and can change your shooting environment and position quickly. I prefer the tide receding to an incoming tide; firstly, it’s safer and won’t have the potential to leave you stranded or swamped with water. Secondly, beach features are more likely to be wet as the water recedes and nearly always look better wet for reflective quality, light contrast and colour saturation.
- Low Tides:They rarely offers much in terms of water movement. However, it can create a safe environment for exploring features such as sand patterns, rock pools and details such as seaweed patterns. It’s often best to photograph these soon after the water has retreated as wet rocks in particular usually look much more effective than dry rocks and water left behind and creating patterns in the sand can disappear after an hour or so.
Tides can come in quickly. At best you can get wet; at worst you can get stranded or swept out to sea. Be careful at all times and do not underestimate how quickly the tide can come in. If you can, check tide times beforehand and wait until the tide is on the turn or receding.
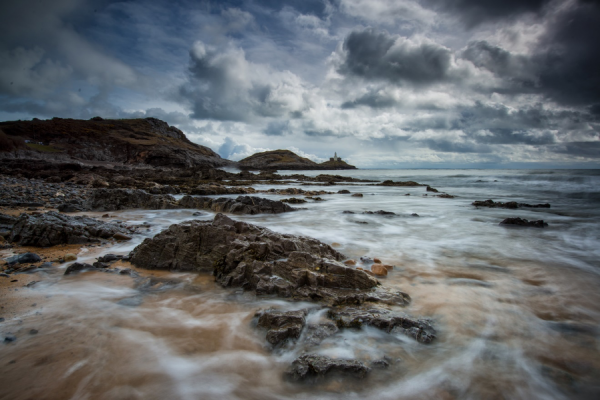
Medium tides are often good for water flows over coastal features;it’s best as the tide is going out as the features will be wet and it’s safer. It’s good to experiment with shutter speeds to see the different effects. 16-35mm lens at 16mm. 2 sec exposure; f14; 100 ISO. 6 stop ND filter, 3 stop GND filter
The Weather and Lighting Conditions
You’ll see that my images are largely taken at the beginning of the day or in changeable weather. I also tend to shoot against the light for contrast, drama and colour saturation. I therefore tend to go to locations such as Bracelet Bay with a changeable forecast in low pressure weather:
- There is the promise of striking sunrise colours with cloud in the sky; perhaps especially when the sun has already risen, which on a clear day can be difficult to work with
- Clouds bring changing light and a wide range of photographic opportunities
- This weather type often has strong winds, offering waves and water movement.
- You usually don’t know what is going to happen next!
Choose your composition (see section on composition below) and wait for the light to work its magic! It might not do precisely what you’d like (my favourite would be lighting up the lighthouse while everything else is dark!) but in changing light conditions, you’ll almost certainly get a range of lighting effects.
Changing Light at High Tide: A typical shot in changing light with the sun appearing from between clouds. It was also taken at high tide. You’ll need a GND (Graduated Neutral Density) filter for this type of shot to balance exposure. 24-70mm at 28mm. 1/320 sec, f8
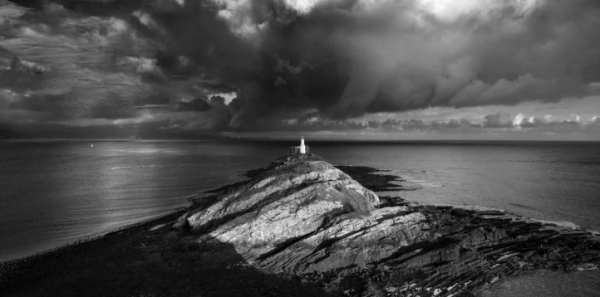
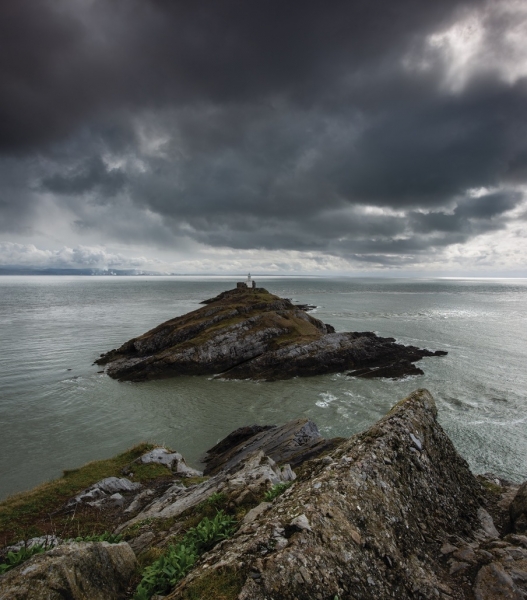
Changing Light on the Lighthouse:This was taken from the hill above the lighthouse. The light direction was a little too much behind me for my liking but it was still effective.
YOUR COMPOSITION
Using a feature: Bracelet Bay has a classic feature, the lighthouse which is a strong single focal point. In general, coastal landscapes are good locations for this style of composition as features such as lighthouses and castles are often unobstructed by conflicting features with open sky and sea on one side, giving real focus and strength to the image. I prefer to give the feature space so will normally place if to the side of the image, letting the sea and sky dominate the negative space.
Using a feature:With this image I’ve used the conventional ‘Thirds’ composition, giving the light house space by placing it to the left. By the time I took this, the tide had receded too far for an effective image. High tide is nearly always best for drama. Cropped image with 50mm lens: 1/200 sec. f8, 50 ISO
Using Foreground: This is important but needs to be considered carefully. Foreground ends to be a strong part of coastal scenes, connecting the lighthouse with its surroundings and giving it context. However, it’s very easy to let the foreground dominate while letting the background recede into insignificance through use to an ultrawide angle lens. Think about how your relationship of foreground with background works and experiment with focal lengths. Above all, try to keep your foreground simple
Using foreground:I placed the cluster of rocks in the middle distance; the water isolated them from other surrounding details. 24mm lens: 1 sec. f8, 100 ISO. 6 stop ND filter, 3 stop GND filter
The foreground at Bracelet Bay can look cluttered; there is a mix of sand, pebbles and rocks which has to be used with care. The panoramic image on the previous page has too much foreground clutter as the tide was out. Water can cover much of potentially conflicting detail, leaving one or two features; this can really help the composition.
Using Perspective and Lead-in Lines:This is closely associated with the use of foreground but gives the image a different emphasis. However, it’s very easy to let the foreground dominate while letting the background recede into insignificance
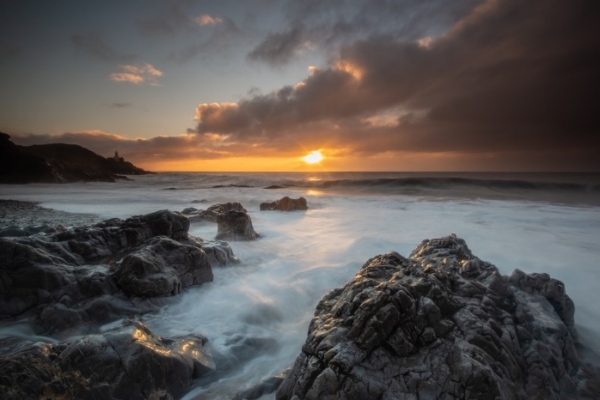
Using foreground:The incoming tide covered up much of the foreground, isolating the rocks which were placed in a way that took the eye through the scene to the background. It has as a result diminished the significance of the lighthouse so think about this when selecting your position and lens. 16mm lens: 1 sec. f10, 100 ISO
With the image above, I got in between the rocks rather than include them at a distance (in the middle ground). They therefore become the key focus for the image rather than act mainly as a foreground for the lighthouse. The arrangement of the rocks also acts as a lead-in line into the image. This is an arrangement I frequently use in my wide-angle landscape images; using a feature in the corner of the frame and then letting other elements take your eye into the image and the background.
In addition, think about the height that you take the picture from and how close you are to the foreground, as this also changes the relationship between foreground and background and influences how much of the middle ground is apparent in the images. Again, experiment with different shooting heights and positions
Using Lighting:As you can see, most of my images are shot against the light for drama, colour and impact. Exposure control is therefore very important; you’ll need to protect the highlights while making sure that you have sufficient shadow detail. Careful exposure control is important and you may nee to use a GND (Graduated Neutral Density filter).
However, coastal landscapes don’t have as much of a contrast issue as inland landscapes. Water reflects much of the light from the sun (in fact with bright direct sunlight, it can reflect so might direct light that it’s virtually impossible to capture detail in the water without blowing highlights). However, when there isn’t direct sunlight on the water, a 2 stop graduated filter will usually balance exposure (see advice on filters below).
YOUR EXPOSURE – VARYING SHUTTER SPEED
Freezing Motion with Short Exposures:Waves crashing against a lighthouse is one of those classic coastal scenes. Many coastal images use long exposures, but you don’t want your crashing wave to dissolve into a blur! Therefore, you’ll need a short shutter speed (usually no more than 1/100 sec) and take a lot of pictures to get one that you’re happy with!
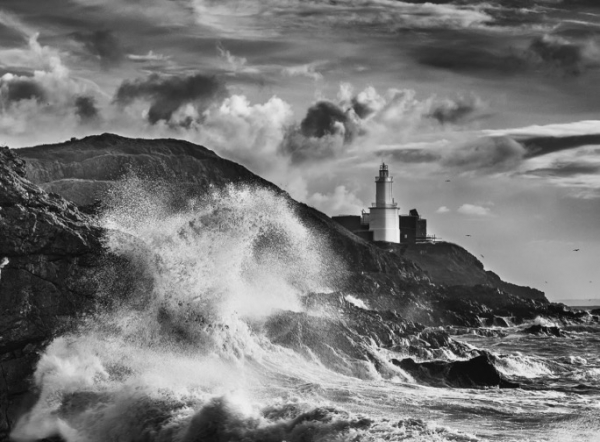
Capturing a Wave:I captured a striking curve in the wave as it crashed against the rocks. You’ll need to take a number of images to get something you like as timing is critical. 70-200mm lens at 160mm, 1/100 sec exposure; f11; 100 ISO
While a tripod isn’t essential when using fast shutter speeds, it’s very useful in placing the camera in a fixed location and letting you just wait for the moment to capture your shot. Set your camera to high speed continuous fire and wait for the wave to come in. Make sure that you start shooting early as there is always a brief lag in your reflexes and in the ability of the camera to record the image. There’s generally no ‘wrong or right’ about each image but often down to personal preference
Using slight movement:This was taken further down the Coast at Burry Port but illustrates the use of a slightly longer shutter speed to capture an impression of movement in the wave without creating blur. 16-35mm lens at 24mm, 1/60 sec exposure; f13; 100 ISO
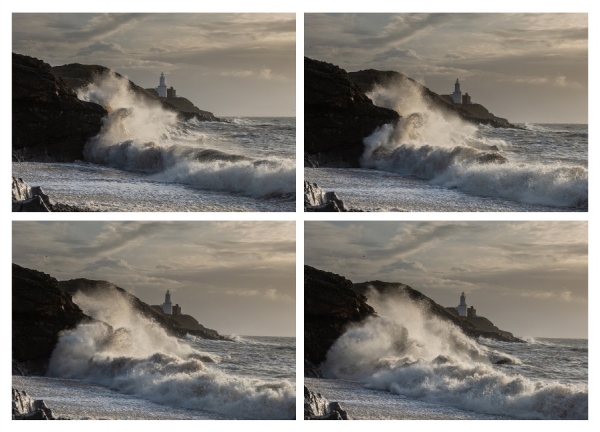
The images below were taken using continuous (Burst) mode, which allowed me to choose the best from them. Take as many as you can while the waves are coming in; almost certainly one in particular will stand out!
Capturing Movement with Long Exposures:This offers a range of creative opportunities, from inducing some movement to completely smoothed out water and more in between. A described below, unless it’s before dawn or after dusk, you’ll need ND filters to lengthen your shutter speeds to the amount you’re looking for. Try to use ND filters rather than reduce the aperture to a minimum as it increases flexibility with shutter speed.
Key things:
- Use a receding tide:this is both safer and is more likely to result in wet features, nearly always more appealing than a dry beach.
- Take your pictures as the wave is going out rather than coming in.That way you’ll get the streaks of water swirling around coastal features. Set your camera to continuous release while the water is receding.
- Experiment with shutter speeds from around ½ sec to around 5 seconds.A second or so will induce some movement ad should produce streaks of water while shutter speeds of longer than a few seconds will start to blur water detail completely
The following comparative examples illustrate the different effects of using long exposures using different shutter speeds. The first at Talisker Bay on the Isle of Skye is on a smooth sandy beach; the second at Bracelet Bay is on a beach with pebbles and rocks. As you can see, the results are very different.
Talisker Bay Example – smooth sandy beach
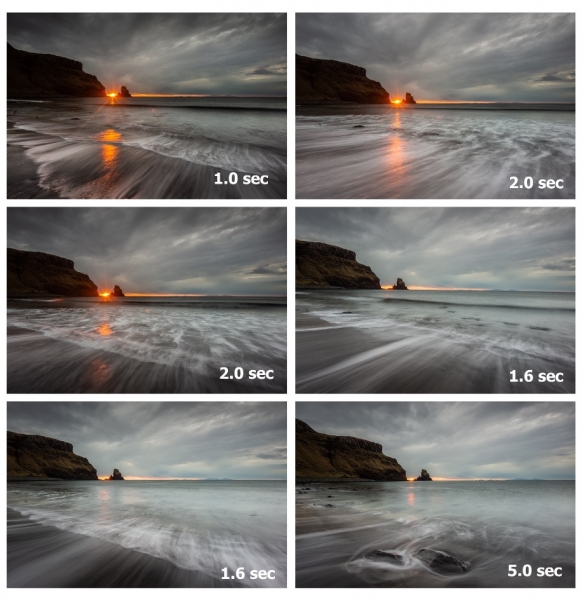
The image examples above are taken from Talisker Bay on the Isle of Skye. They illustrate a range of shutter speeds as the sun went down.
I captured the varying effects as the sun went down. It briefly appeared from under the clouds until it went below the horizon. The smooth sand meant that I was able to capture white streaks as the tide receded. Every image will be different so just experiment. The final one on the bottom left was from a different position and used a rock to break the flow of the water. Notice that the shutter speed is longer as well as the rock slows the water down.
They made a nice set of images, the only disappointment being that there colour went out of the sky the moment the sun went below the horizon!
Bracelet Bay Example – Rocky beach with pebbles
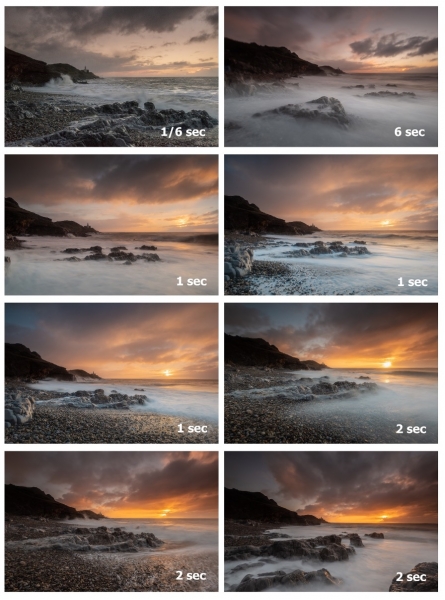
This set of images was taken at Bracelet Bay. They illustrate the effects of movement on a rocky beach as the sun came up.
There is more turbulence in the water and instead of the white streak effects I achieved at Talisker Bay, there’s more of a mist effect created by the waves.
THE TECHNICAL STUFF
Your Camera Controls and settings:To get the best from your camera and the highest opportunity of getting the results that you need, remember the following:
- Always shoot in RAW:This will give you maximum control and depth of data to work with in post processing. This is particularly important with high contrast light. If you’ve never shot in RAW, you will need a software programme that enables you to process this.
- Use Manual Exposure or Shutter Priority:I always shoot in manual but either way you will need control over shutter speed to control the effect on the image. I also don’t want the camera changing aperture (for DOF control) so prefer not to use SP / TV either.
- Use a Single Focus Point with either Manual Focus or Back Button Focussing:You don’t want the camera to try to refocus when pressing the shutter; with water it will often fail to do so. Therefore, either use manual focus or use the Back Button (AF-ON) option. This will delink the shutter release button from focussing and gives you more control.
- Use a remote release:I often suggest using the 2 second self-timer in landscape photography as you have no contact with the camera during the exposure. However, with wave movement you need to capture the shot instantly to capture motion as you see it so you’ll need a remote release.
- Turn off Long Exposure Noise Reduction (NR):If kept on the camera will take as long to process the image as it did to take it, particularly frustrating with long exposure photography. You will normally find it in the Set Up menu.
- Turn off VR / IS when using a tripod with long exposures:it may introduce vibration and movement, particularly with relatively short exposures of around a second.
- Use Continuous Shooting / Burst Mode when shooting moving water:If doing a long exposure then keep to a single shot of course. However, if you wish to capture waves, use Continuous Shooting as it will rapidly give you a series of images. You will not know which will work out best until after shooting.
- Experiment with shutter speeds:they all have vastly different effects with moving water and wave motion. Don’t feel the need to smooth out the water with all shots as you may prefer the detail of sorter shutter speeds. Use the following as a rule:
- Freezing Wave Motion – 1/100 sec or shorter
- Slight Movement / Some Blur – 1/15th- 1/60thsec
- Moving Water around beach features: ½ sec to 2 secs (but experiment with 5 seconds for a different effect)
- Smoothed out water and the ‘misty look with waves: 10 secs or longer
- Moving Cloud with Moving water: 30 seconds up to several minutes (depending on wind speed)
- Use Continuous Shooting / Burst Mode when shooting moving water:If doing a long exposure then keep to a single shot of course. However, if you wish to capture waves, use Continuous Shooting as it will rapidly give you a series of images. You will not know which will work out best until after shooting.
YourLenses:In order to get a variety of wide views and close up images you’ll need a range or lenses from wide angle to telephoto. It’s likely that you’ll use the wide angle the most for strong foreground features and many of the ‘sky’ shots, but the greater range of focal lengths you have, the greater your creative options.
Remember the general principle that a wide-angle lens ‘stretches’ perspective and makes things close to the camera appear bigger in relation to the background and that a telephoto lens compresses perspective and has the opposite effect. Therefore, a consequence of strengthening the foreground element will be to reduce the lighthouse in significance. There is no right or wrong about this, but think about how much impact you want the lighthouse to have.
Your Tripod: In sort, get a good, solid one with a detachable baseplate that you can screw into the bottom of your camera ready for use. It’ll need to be heavy enough to resist wind and provide a solid enough base to cope with waves and water around its base. If you don’t need a long shutter speed, try handholding your camera as it gives you more flexibility of movement and is quicker in a rapidly changing scene, but if you’re down to anything under 1/25thsecond you’ll need to use one.
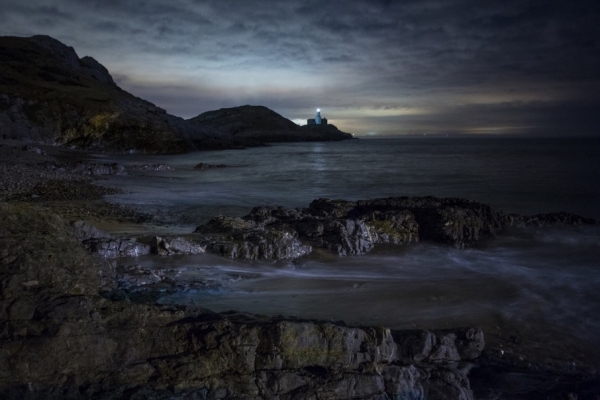
Night shot at Bracelet Bay:4 second exposure at f4 & 3200 ISO
Any situation requiring a long exposure (such as this night shot) will need a strong tripod able to keep the camera still, particularly in windy conditions or if there is water around the tripod legs.
USING FILTERS
You’ll possibly find yourself needing and using filters as much in coastal photography as anywhere. You’ll be doing long exposures which require Neutral Density Filters, you’ll be shooting against the light which could mean using a Graduated Neutral Density Filter (GND, and you may want to reduce glare and reflections and use a PL (Polarising) filter.
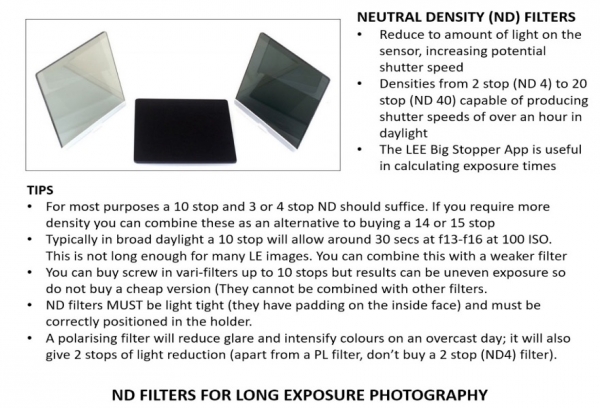
Neutral Density Filters: ND (Neutral Density Filters). In any kind of daylight, you’ll be struggling to use shutter speeds of anything more than ¼ second even with a low ISO and small aperture, so you’ll need some Neutral density filters. You may find yourself experimenting with shutter spends of no more than a second, up to a few minutes. These have different effects on the water and on the sky. These will need different filters from a 4 stop to extend shutter speeds to a second or two, to a 10 stop or more for longer shutter speeds. You can also add filters together if using a square filter system.

Long Exposure Image:This type of image will always need the use of an ND filter. A shutter speed of several seconds or more in daylight is impossible without one (though Mirrorless and Phone technology is now complicating matters!)
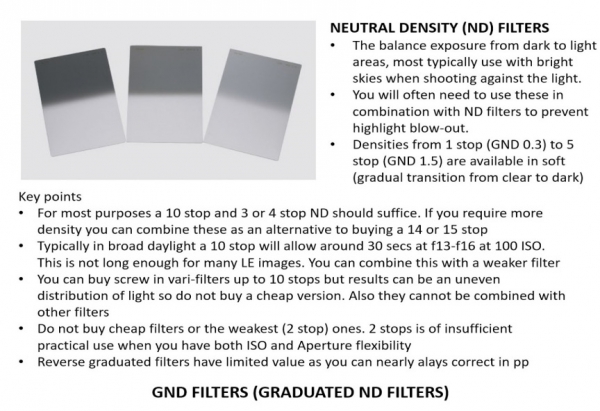
Graduated ND Filters:These balance exposure between highlights and shadow / light and dark areas of the image. As explained earlier this is often not as much of an issue with coastal photography as water reflects much of the light, but this is not always the case, particularly with dark rocky foregrounds. In these situations you’ll definitely need a GND. With coastal photography, a hard-graduated filter is usually best suited, particularly where the sun is close to the horizon (i.e. where the brightest light and greatest contrast is) and where you want the strongest effect.
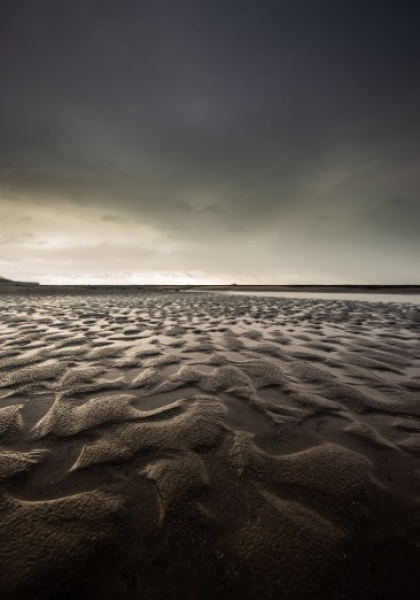
Reflection in the Sand:With this image, I used a Hard-Graduated filter as there was a flat horizon and the brightest light in the sky was close to it. In reality I could probably have managed without a filter as much of the light was reflected in the sand. This image was taken a little further down the coast at Swansea Bay.
I considered using a Polarising Filter to bring out more detail in the sand, but found that it reduced the reflection and contrast in the image.
16mm lens: 1/50 sec f9.0 ISO 64. 3 stop GND hard graduated filter.
IN SUMMARY
Our coastline has a huge range of opportunities for creating stunning images. I’ve covered just a cross-section in this article base on technique, composition and light, but I hope it will inspire you to visit your favourite beach, explore it with your camera and go in different light and at different times.
Use the weather forecast as a guide, check the orientation of your favourite landscape and keep an eye on tide times (you can always find this by checking on www.tidetimes.org.uk).
Finally remember the messages about safety in this article; many of us have been caught out with a rapidly incoming tide or storm waves more than once!
To book some one-on-one Coastal Photography tuition, follow this link www.clik-trip.com