LONG EXPOSURE PHOTOGRAPHY: Using Cloud Movement

Do you ever look at those images with streaky skies and wonder how they’ve been taken? This article will show you how with illustrations from my own work. You’ll need to use your technical and creative skills with the camera as well as have an understanding of how different clouds translate into imagery. Above all, using clouds for long exposures, while needing some patience, is great fun as you often don’t know how they’re going to turn out!
There are inevitably some generalisations in this article; every situation is different and unpredictable so this is a guide only – unpredictability is half the appeal of photography! The first question you need to ask yourself is what effect am I looking to create? Cloud movement can create images ranging from striking and dynamic with a strong perspective effect to a smoothed out sky to create a tranquil and static result. It can also produce abstract images when composed with other simple features. Be clear on what you’re looking for to achieve the best results!
What kind of weather do I need?
Firstly the blindingly obvious; you need clouds! Any sort of cloud will produce some form of result but different clouds will create different effects; even apparently still wispy cloud has some movement if the shutter is left open for long enough. However the cloud type, colour (i.e. time of day), wind speed and wind direction will affect the appearance of your image so some knowledge of meteorology and cloud behaviour is important as well as your photographic knowledge.
However, as a generalisation, low pressure showery weather typically produces a mix of light and dark clouds with stronger winds creating high contrast and fast cloud movement. High pressure weather typically produces light, slow moving cloud requiring longer shutter speeds and potentially more difficulty in creating contrast in the image. Uniform white or grey skies can be effective for minimalist images particularly when set against smooth water. My image examples illustrate a variety of situations.
Choosing your Subject
Being clear on your choice of subject and its suitability for long exposure photography will help in achieving successful results
- What kind of subjects go best with cloud movement?Two in particular are my favourites; firstly where the smoothed out sky is balanced with the light tones of smoothed out water and secondly where they contrast with the hard lines of architecture or clear single subjects. Of these by far the majority of my images are of buildings and architectural features so these are mainly the focus of this article. I’m less enthusiastic about its use with mountain and rural landscapes where I feel that the natural sky texture is an integral part of the character and mood of natural light.
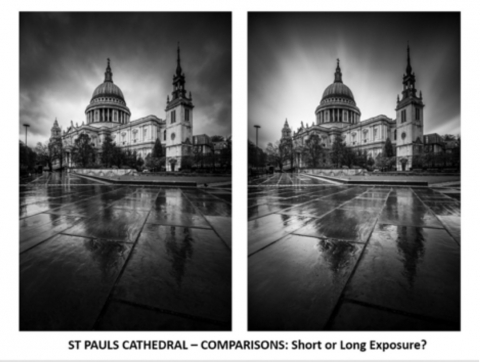
- Is long exposure cloud movement right for your image?It’s easy to get into the habit of treating every photo opportunity as one with cloud movement. However, think about whether it’s appropriate for your image. Always take a standard short exposure image as well as long ones. You may find that you prefer the cloud detail and that it works better with your subject. Cloud movement isn’t always the best choice! Image Example 1 - St Pauls Cathedral) shows a comparison in which I prefer the short exposure as the cloud detail adds to the character of the image.
USING CLOUD MOVEMENT AS PART OF YOUR COMPOSITION
Using wind direction:The wind direction will dictate the direction of cloud movement. The direction of movement should complement not conflict with your subject. Many of my images have a clear single subject in the centre of the frame with the cloud movement towards or away from the camera. This forms a strong perspective composition. (Image Example 2 – Penarth Pier).
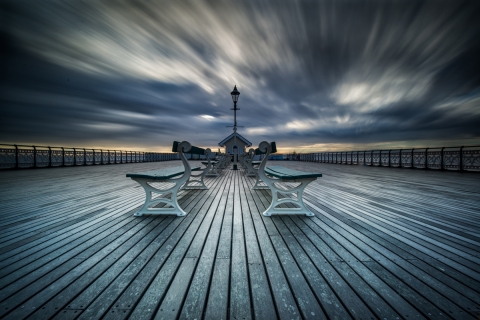
Example 2 – Penarth Pier illustrates cloud movement used in compositional perspective: Detail: Nikon 16-35mm lens @ f18. 256 secs 100 ISO. 15 stop ND filter 3 stop GND filter
With this image, the cloud movement forms an integral part of the composition by reflecting the perspective lines of the planking on the pier. The blue colouring is the effect of using a strong ND filter, but I preferred the colouring to colour correction or black and white.
The addition of a reflection in water will strengthen this by reflecting the cloud streaks. You may also look to complement the flow of water or a horizontal pattern by using a left to right wind direction across the camera. (Image Example 3 – Barmouth Estuary andImage Example 4 - Loch Nah Achlaise)
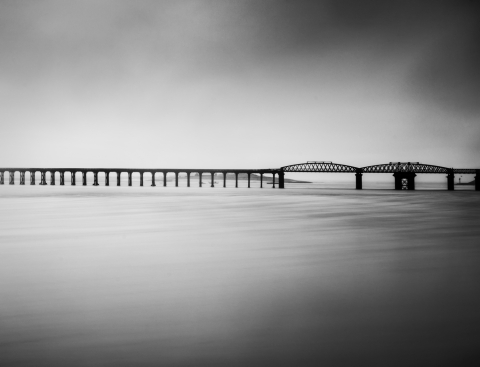
Example 3 – Barmouth Estuary illustrating horizontal cloud direction with water: Details Nikon 16-35mm lens @ 35mm. 30 secs, f16, 50 ISOIf you have water flowing from left to right as in this example, then horizontal cloud movement complements the image
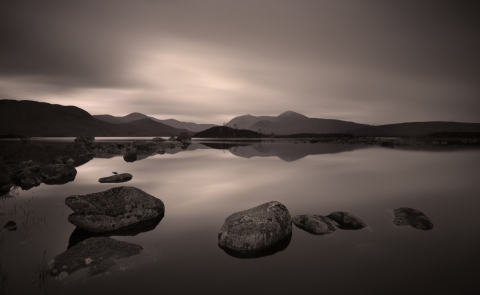
Example 4 – Loch Nah Achlaise, Rannoch Moor Scottish Highlands illustrating smoothed sky and water with light slow cloud: Sigma 10-20mm lens. 186 secs @ f10 100 ISO.
Flat almost featureless cloud created ideal conditions for smoothing out water and resulting in a very static, tranquil effect. Generally, movement from left to right suits static tranquil images. I produced a toned effect from the black and white image.
Using landscape features to balance sky tones:Think of your cloud movement as a part of the composition rather than a subject in itself. Therefore consider both as a form within the image rather than ‘a cloud movement image’. This approach may lead you to decide that a long exposure isn’t appropriate.
Shooting Abstract images:One of the great things about long exposure photography is that it can simplify tones. This makes it perfect for minimalism and abstracts. Image Example 5 (Cardiff and Vale College),shows how a combination of strong cloud movement and building lines forms strong abstract imagery
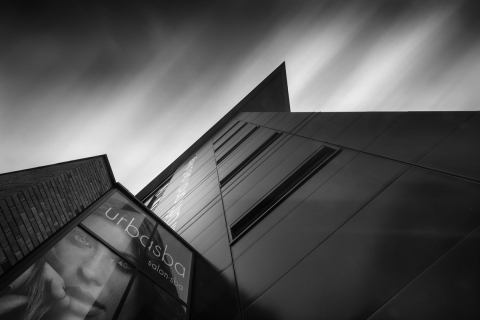
Example 5 – Cardiff and Vale College illustrates creating abstract images with cloud movement: With this image the simple tones of the sky mirrors the form of the building. Where possible try to ensure that the cloud movement complements your subject rather than conflicts with it. The sky was blue with white cloud. Details: Nikon 16-35mm lens at f22. 83 secs; 50 ISO. 10 stop ND filter
CHOOSING YOUR IMAGE STYLE
As mentioned in the introduction, different clouds can produce very different results, from a wide variety of tones in high contrast images to simple uniform white or grey tones.
Shooting for Contrast:Choose a day with a mix of light and dark clouds. This will produce a wide range of greys from dark to light; if you shot against the light (the sun will often create contrast even on a cloudy day) this will create greater contrast than if you shoot away from the sun. Dark rain clouds can be particularly effective although this kind of weather can be difficult with long exposure photography, for the simple reason of keeping the lens dry in the rain when the shutter is open for a long period of time. An example of shooting against the light is onImage Example 6, Maen Llia Standing Stone
![]()
Example 6 – Maen Llia, Brecon Beacons. Illustrates dark clouds high contrast with wind towards camera & strong perspective effect: Details: Nikon 16-35mm lens at f9. 30 secs; 100 ISO. 3 stop graduated and 10 stop ND filter
Single clear features are ideal for cloud movement towards or away from the camera as the cloud streaks radiate out from the feature. Shooting against the light increases contrast and the sense of drama. Wind going from left to right rarely works as well with this kind of image though you might also try changing shooting position to place the wind behind you (important if raining). The cloud was fast moving with showery rain with this example so a 30 sec exposure was sufficient.
This kind of weather can be difficult with long exposure photography, for the simple reason of keeping the lens dry in the rain when the shutter is open for a long period of time.
A blue sky with white cloud will also produce a high contrast image but will generally be of two tones; one dark for the sky and one light for the cloud. In my opinion this approach generally only works well in black and white. A colour and monochrome example is Example 7A & 7B, Liberty Gardens
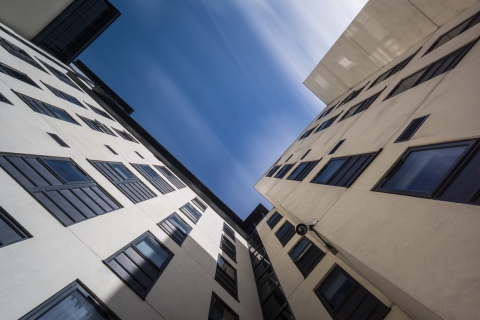
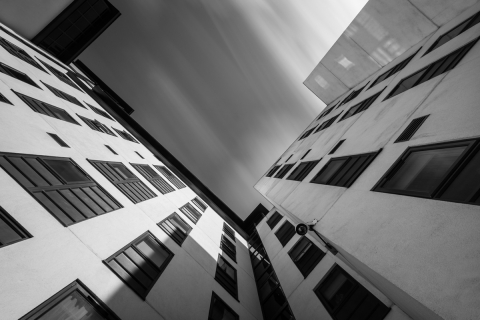
Example 7 – Liberty Living Development, Cardiff illustrates white cloud with blue sky
White cloud and blue sky can be effective in black and white. Instead of producing a range of tones it tends to produce 2 simple light and dark tones. Although it was a bright day, the clouds were fairly fast moving. Be aware that with a little cloud in the sky, a too long exposure will make the cloud virtually disappear. Details: Nikon 16-35mm lens at f16. 122 secs, 50 ISO. 15 stop ND filter
Shooting for Minimalism:If you have a single clear structure or form then a sky with little original detail can be smoothed out completely with a long exposure. This isolates the subject as they sky doesn’t compete for attention. A mirror image with smoothed out water can also be very effective with this style of image. Both Image Example 3, Barmouth Estuary and Image Example 4, Loch Nah Achlaise above illustrate this
Black and White or Colour:Most of my long exposure images tend to be in monochrome, particularly if shot in daylight ‘colour neutral’ hours; I find that the tonal subtleties are often better reflected. Don’t forget to shoot in RAW and do this in post-processing though as colour translates to tones in monochrome; it’s not just a question of light and dark. However if shooting at dawn and dusk the cloud colouring can be effective; a good example is The Elan Valley Reservoir Sunset Image (No 8)

Example 8 – Elan Valley Reservoir – illustrates colour vs monochrome colour example.
In this example the strength of the image is in its colour, taken about 10 mins before sunset with the sun behind clouds. The effect is strengthened with the colour reflected in foreground water. Details: : Nikon 16-35mm lens at f22. 83 secs; 50 ISO. 3 stop GND and 10 stop ND filter
CAMERA TECHNIQUE
How long should my exposure be?This depends on two things: the effect that you’re looking for and the speed of cloud movement. Don’t always assume that you need to go for the longest exposure possible. You may need only 10 seconds with fast moving clouds going up to 15 minutes if here is very little movement. However, make sure that you use a short enough shutter speed to prevent slight cloud movement or a long enough shutter speed to make it look deliberate! Certainly a few seconds in moving cloud can be a mistake.
Conversely, it’s easy to overdo the cloud movement and lose detail; you also many not need a great amount of movement to get the effect that you want. Image example 9 - Hadrians Wall uses a 10 sec exposure which slightly blurs the sky and because I wanted to hint at movement it creates. A longer exposure diluted the effect. Conversely the Sage Centre example (Image 10)was an 8 minute exposure. There was virtually no movement to the naked eye but leaving the shutter open long enough produced a strong effect.
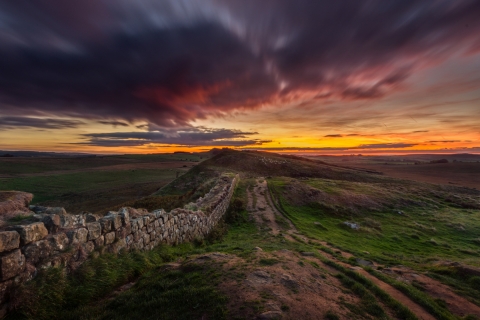
Example 9 – Hadrians Wall illustrating Use of Shorter Shutter Speed for limited movement: Details: Nikon 16-35mm lens at f11. 10 secs; 100 ISO. 3 stop graduated and 4 stop ND filter
You may not need much movement to create the effect that you’re looking for. A little movement from a 10 second exposure complemented the effect of the leading line of the wall and kept the intensity of the colours.
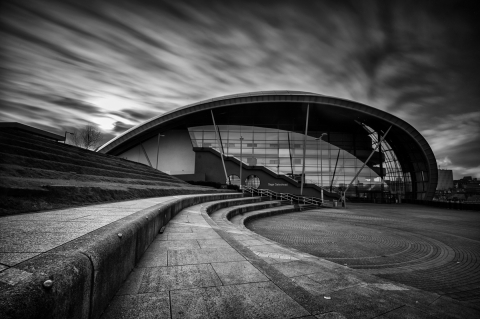
Example 10 – Sage Centre, Gateshead illustrates slow moving clouds against the sun creating high contrast image.Details: Nikon 16-35mm lens at f16. 462 secs; 100 ISO. 2 x 3 stop graduated and 15 stop ND filter
With this example, there was virtually no wind but I was able to create movement with an 8 minute exposure. The sun in the sky also created strong contrast necessitating two 3 stop graduated filters as well as a 15 stop ND filter. The cloud movement also reflected the profile of the steps in front of the Sage Centre., almost creating an effect of the sky and foreground rotating around the structure.
Other Camera Settings:Typically you’ll be using smaller apertures to lengthen shutter speed but it’s best to use a mid-range to smaller aperture for depth of field and be controlled by the strength of filter that you use. You’ll also typically be using the lowest ISO setting on your camera for both shutter speed and image quality. Remember that you’ll need to focus in advance with many cameras and then add the ND filter; use either manual or back button focus otherwise the camera will try to refocus before capturing the image. Also turn off Long exposure NR on your camera. If you leave this on it’ll take as long to process the image as it did to take it!
Using Filters:As you’re looking for cloud detail most of your images will be taken in daylight, so unless it’s nearly dark you’ll need to use ND (neutral density filters). I recommend getting a 10 stop and a 4 or 6 stop as you can add these together. As a typical example, an image in normal bright daylight at f16 and 100 ISO will produce an exposure of 30 secs with a 10 stop filter. This will frequently be insufficient to produce the cloud effect that you need and you may need to combine ND filters or use a stronger one.
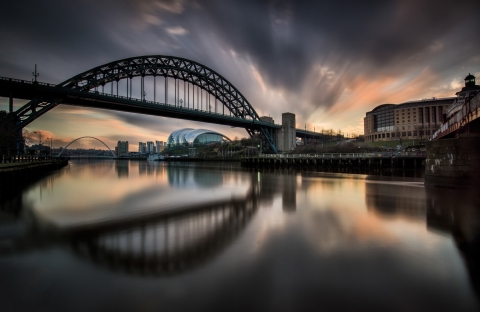
Example 11 – Tyne Bridge, Newcastle illustrates the use of both a Graduated ND filter to balance exposure and of a strong ND filter to allow movement. Details: Nikon 16-35mm lens at f16. 153 secs; 100 ISO. 3 stop graduated and 12 stop ND filter
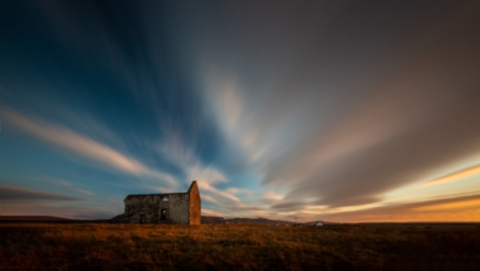
Example 12 – Kilmuir Church, Isle of Skye required precise exposure control as I was shooting against the light. The mix of cloud and blue sky with a moderate wind for long exposure photography. Details: Nikon 16-35mm lens at f14. 313 secs; 100 ISO. 3 stop graduated and 12 stop ND filter
Tripod and other accessories:It goes without saying that you must use a stable tripod and do everything you can to keep the camera still including turning off image stabilisation. If there is any wind at all spread the tripod legs out to improve stability. With most older DSLR cameras you’ll need a remote release that locks the shutter down as they don’t go beyond 30 secs before you need to use ‘Bulb’. Newer DSLR’s and all Mirrorless Cameras have a T setting which gives you more control and many mirrorless models go to presets of several minutes.
And finally……….just a reminder of a few technical things to remember:
- If using an older DSLR, you’ll need a remote release to use Bulb setting (i.e. beyond 30 secs)
- Turn off VR / IS on your lens to prevent vibration during exposure
- Turn off Long Exposure Noise Reduction in your camera menu
- Always use a stable tripod with legs that extend outwards for maximum stability
- Double check your filters for any smears of dust, particularly when shooting against the light.
- If you have a Nikon, you’ll need to protect the viewfinder from ingress of light. Many models have a rear curtain which you can close but others do not.
- If using Live View or Mirrorless camera you should be able to focus through ND filters. If using a DSLR viewfinder this is unlikely and you’ll need to focus beforehand.